A ceiling stain is a warning, but it doesn’t prove the roof is leaking. If you’re wondering what to do about a roof leak stain on the ceiling, photograph it, check whether it’s damp or spreading, and keep clear of any soft or sagging area. Plumbing or HVAC problems can also leave stains, so identify the likely source before arranging cosmetic repairs.
It’s understandable to worry when a mark appears overhead. First find out whether water is still getting in and whether the ceiling may be weakened. A stain that grows after rain could point to a roof leak, while its location and nearby plumbing or HVAC equipment may offer other clues.
This guide explains how to assess the stain, inspect the ceiling and attic safely, and distinguish possible roof problems from plumbing leaks or condensation. You’ll also learn when a repair needs prompt attention and why covering the mark before fixing its cause can lead to more damage.
Key Takeaways
- Track whether the stain changes after rain, and photograph its edges so you can notice if it spreads.
- Use the stain’s location and nearby plumbing or HVAC equipment to narrow down possible sources before making cosmetic repairs.
- Stay clear of soft, sagging, or bubbling ceiling areas, which can signal trapped water or weakening materials.
- Look for roof clues such as damaged shingles, flashing, vents, or valleys, but avoid unsafe roof inspections.
- When signs point to roof damage, roof leak repair can address the source before the ceiling is patched or repainted.
Is a water stain on a ceiling serious?
A ceiling stain can signal active water damage, but it doesn’t prove the roof is leaking. Check whether it’s damp, spreading, soft, or sagging, then identify the likely source before making cosmetic repairs.
- Look at the stain’s location and when it appears to identify possible causes. Roof leaks can leave uneven yellow-brown rings, especially after heavy rain. Other common causes include plumbing leaks, overflowing appliances, HVAC condensation, humidity, and damaged waterproofing. A bathroom stain may come from condensation, while a mark below a bathroom may point to a toilet seal or pipe. If the mark stays dry and unchanged, cosmetic repair may be enough once the underlying cause is addressed.
Act quickly on damp materials: according to the U.S. Environmental Protection Agency, if wet or damp materials or areas are dried 24-48 hours after a leak or spill happens, in most cases mold will not grow. According to the Centers for Disease Control and Prevention (CDC), structural materials that cannot be thoroughly dried within 48-72 hours and to a moisture content below 20% should be replaced.
Check for Damaged Shingles and Faulty Flashing
From the ground, look for missing, cracked, or curled shingles near the stain’s general roof area. Check visible flashing around a chimney, vent, or skylight for gaps, lifting, or deterioration. Damaged shingles and faulty flashing can let rain pass beneath the roof covering, but water may travel before appearing indoors. Don’t climb onto a wet or steep roof to inspect it.
Inspect and Repair the Roof Leak
Arrange a roof inspection if the stain appears or grows after rainfall. An inspection can check shingles, flashing, roof penetrations, and valleys for water-entry points. Common repairs include replacing damaged or missing shingles, repairing or replacing flashing, sealing penetrations, and addressing valley damage. Roof inspection twice a year and after storms can help spot trouble before another ceiling stain develops.
- Judge urgency by the ceiling’s condition, not its color alone. Bubbling paint, peeling plaster, soft drywall, or a sagging area can indicate trapped water and worsening damage. Keep people clear of a bulging or crumbling section, and don’t press it to test its strength. Photograph the stain and note whether rain, a running appliance, or HVAC use came before it. Those details can help distinguish roof damage from plumbing leaks or condensation.
If a ceiling is stained but dry, first confirm that the leak or moisture source has stopped. Repainting before fixing active water entry can hide a growing problem without preventing further damage. For a suspected roof leak, a professional inspection can determine whether damaged shingles, faulty flashing, or another roof area needs repair.
Finding and fixing the source before cosmetic repairs
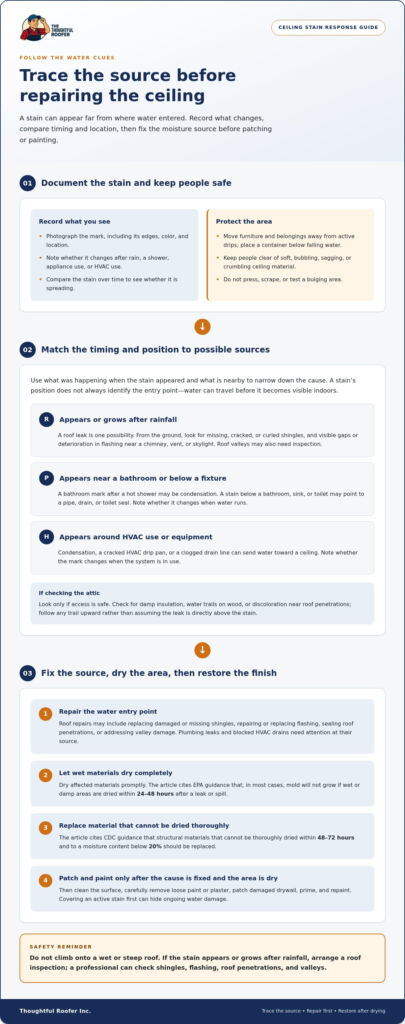
Follow the water clues before repairing the ceiling surface. A stain can appear far from the entry point, so compare when it appeared and where it is with nearby roof, plumbing, and HVAC features.
Take Immediate Steps After Finding a Stain
Photograph the mark and note its edges, color, and location, then compare it after rainfall or appliance use. Move furniture and belongings away from active drips, and place a container below the leak if water is falling. If the ceiling feels soft or begins to sag, keep people clear rather than pressing or scraping it.
Write down whether the stain appeared after a storm, a shower, or HVAC use. A bathroom mark after a hot shower may point to condensation; a stain below a sink or toilet may suggest plumbing. This timeline can help distinguish a fresh leak from an older surface mark.
Locate the Leak Source
Compare the stain’s position with the roof above, plumbing lines, and HVAC equipment. If it grows after heavy rain, inspect visible roof areas from the ground for missing or damaged shingles and blocked gutters. If it appears after water runs in a bathroom, check nearby fixtures, drains, and the ceiling below for matching changes.
Look in the attic only if access is safe. Check for damp insulation, water trails on wood, or discoloration near roof penetrations, then follow the trail upward rather than assuming the ceiling mark is directly below the leak. A cracked HVAC drip pan or clogged drain line can also send water toward a ceiling.
Fix the Source Before Painting
Repair the entry point before patching, priming, or painting the ceiling. A roof leak may require replacing damaged shingles, repairing flashing, or sealing a roof penetration. A plumbing leak or blocked HVAC drain needs attention at its source. Covering the stain first can hide ongoing water damage while moisture continues behind the surface.
After the source is fixed, let the affected area dry completely before cosmetic work. Scrape loose paint or plaster carefully, clean the surface, and patch damaged drywall only after it is dry. For a persistent roof leak, professional roof leak repair can address the roof entry point before you restore the ceiling finish.
Roof leaks from damaged shingles, flashing, vents, or roof valleys
Dry wet materials promptly, fix the water source, and replace ceiling materials that cannot be thoroughly dried. For ceiling repairs, wait until the area is dry, then clean, patch, prime, and repaint it.
- Trace the roof entry point without climbing onto a wet or steep surface. From the ground, look for missing, cracked, or curled shingles, loose gutters, and sagging roof areas. Check whether the ceiling stain appears after rain, then compare its position with roof valleys, chimneys, vents, or skylights. Water can travel along roof framing before it shows indoors, so the stain may not be directly beneath the opening.
Damaged shingles can let rain beneath the roof covering. Flashing around a chimney or vent can also leak if weather, age, or sunlight has weakened it. Keep leaves and branches from building up in gutters, where overflow can affect roof edges and contribute to water damage.
- Pay close attention to roof vents, exhaust fans, and valleys during an inspection. A deteriorated seal around a vent can let moisture through, while warm indoor air meeting cooler roof surfaces can create condensation. Roof valleys channel runoff, so damaged materials or debris there can interrupt drainage and let water beneath shingles. Don’t remove roofing materials or attempt repairs from an unsafe ladder.
Hail can weaken shingles and other roofing materials, while ice dams can force water beneath them. After a storm, note any new ceiling stains and visible exterior damage. A professional can inspect the roof, locate water-entry points, and determine whether shingles, flashing, a vent seal, or a valley needs repair.
- Call a roofing professional if the ceiling is actively leaking, bubbling, swollen, or spreading, or if the source is uncertain. A roofer can assess missing shingles, deteriorated materials, flashing, vents, and roof valleys. A water-damaged ceiling with sagging drywall or suspected mold also needs professional attention. Damp drywall can support mold growth, and a soft ceiling may require removal and replacement.
Once the roof source is repaired, dry the affected area completely before restoring the ceiling. Ventilate the room and use airflow to help dry exposed materials. Wear gloves and goggles when cleaning or scraping, and don’t cover damp drywall with paint. Patch holes only after the material is dry; stain-sealing primer can then help prevent an old mark from bleeding through.
- Reduce future moisture problems by keeping gutters and downspouts clear of leaves, twigs, and other buildup. Trim overhanging limbs that could scrape shingles during wind, and keep HVAC drains free of debris. Check the roof twice a year and after storms for missing shingles, damaged flashing, or loose gutters. Those visible clues can help you address roof leaks before ceiling damage spreads.
If you notice a musty smell, visible mold, or ceiling materials that remain wet, focus on drying and addressing the underlying cause before cosmetic work. Repainting a damp surface can conceal a stain without stopping moisture. A repaired roof, clear drainage, and prompt attention to new water marks help protect both the ceiling and the structure above it.
Risks from wet ceilings, including collapse and mold growth
Clear the room if drywall is sagging, soft, or shedding material, and call a professional to assess the damage. If part of the ceiling collapses or someone is injured, evacuate the area and call emergency services.
Recognize Sagging Drywall
From a safe distance, look for a ceiling that bows downward, bulges around a water stain, or has soft, crumbling edges. Bubbling paint and widening cracks can also show that water has weakened the drywall. Don’t stand beneath a bulge, poke it, or try to catch falling material. Move people, pets, and furniture out of the room.
A wet ceiling can collapse with little warning, especially when water remains trapped above the surface. If the stain is growing or the drywall feels soft, treat it as a structural concern, not a paint problem. Keep the room clear until the source is fixed and the damaged materials are assessed.
Look for Signs of Mold
Check for visible spots, musty odors, or moldy patches around the stain, nearby walls, and ceiling corners. Peeling or flaking paint can indicate ongoing moisture, though it doesn’t identify mold by itself. Avoid scraping a suspicious patch or disturbing damp drywall, since that can spread debris through the room.
Moisture can remain hidden above ceiling materials even when the visible surface looks dry. A stain below a bathroom toilet, for example, may follow a plumbing leak that continues to dampen the ceiling. Note changes in odor or appearance and share them with the professional assessing the affected area.
- Limit further damage by stopping the water source when it’s safe. If a plumbing fixture or appliance is clearly leaking, stop using it and keep people away from the wet ceiling. For roof leaks, avoid climbing onto the roof during rain or wind. Photograph the stain and any sagging from outside the affected area.
Dry wet materials promptly. According to the U.S. Environmental Protection Agency, if wet or damp materials or areas are dried 24-48 hours after a leak or spill happens, in most cases mold will not grow. Drying can be harder when water has soaked insulation, drywall, or framing behind the visible surface.
- Arrange an assessment if drywall remains damp, smells musty, or shows mold growth. According to the Centers for Disease Control and Prevention (CDC), structural materials that cannot be thoroughly dried within 48-72 hours and to a moisture content below 20% should be replaced. A professional can assess whether affected ceiling materials need replacement after the leak is repaired.
Don’t repaint over a water stain while the ceiling is damp or soft. Cosmetic work can wait until the underlying leak is stopped and the materials are dry. If a ceiling section is sagging, keep the room closed off; if it collapses, evacuate and call emergency services.
Inspecting the ceiling, roof, attic, and plumbing to locate the source
Work from indoor clues toward the roof, and record what changes. A stain’s location, timing, and nearby fixtures can help distinguish roof leaks from plumbing or HVAC problems.
- Map the ceiling stain before inspecting elsewhere. Photograph its edges, note the room and ceiling level, and record whether it changes after rain or water use. A stain on the top floor or beneath an attic makes a roof leak more likely. A mark below a bathroom, sink, or laundry area points toward plumbing or an appliance connection.
Look for dampness, bubbling paint, or a musty smell, but don’t press soft drywall. A moisture meter can measure water in materials such as wood and concrete. Use readings as clues across affected areas, not as a substitute for finding the source.
- Enter the attic only if access is safe, and use a flashlight to examine the roof framing above the stain. Look for water trails, discolored wood, damp insulation, or wet spots around vents and roof penetrations. Follow each visible trail upward because water can travel along framing before reaching the ceiling.
Check insulation and ventilation for signs of trapped moisture or condensation. Warm indoor air meeting a cooler roof surface can leave dampness without a direct rain leak. Don’t step onto ceiling drywall or disturb wet insulation while investigating.
- Inspect roof clues from the ground or another safe vantage point. Look for crumbled or missing shingles, exposed nail heads, sagging roof areas, and loose or clogged gutters. Compare visible damage with the attic’s water trails rather than assuming the roof spot directly above the ceiling stain is responsible.
After rainfall, note whether the stain grows and whether water appears near a chimney, vent, skylight, or roof valley. A roof inspection can assess these areas and identify damaged materials or flashing without requiring you to climb onto the roof.
- Check plumbing and HVAC equipment near the stain. Inspect accessible pipes for moisture, and look around bathroom toilets for leaks near the base or degraded seals. Cracked caulk around a tub or sink can let water pass through to the ceiling below. A clogged drain or leaking joint can also leave a trail.
For HVAC systems, look for water near the condensate pan and drain line. A cracked pan, clog, or disconnected line can cause ceiling spots. Compare the timing with system use, and stop using a fixture or appliance that clearly causes new water to appear.
If attic evidence and exterior roof clues point to the same entry area, request roof leak repair to address the source before ceiling restoration.
Thoughtful Roofer: Asphalt Shingle Roofing
Thoughtful Roofer Inc. can help when inspection clues point to roof damage, missing shingles, or a leak that needs repair. Its Asphalt Shingle Roofing service addresses shingle-roof needs, while Roof Leak Repair can address water entry before ceiling finishes are restored. After hail or other storm damage, Storm Damage Repair is another relevant option.
Choosing the right next step starts with the source: plumbing and HVAC leaks need attention at their own point of entry, while roof-related stains call for roof repair. Once the leak is fixed and affected materials are dry, you can plan the ceiling restoration without simply covering an active problem.
Contact Thoughtful Roofer Inc. to discuss a suspected roof leak, or visit thoughtfulroofer.com.
Make the Next Step a More Secure Home
A ceiling stain can be a useful prompt to look beyond the immediate repair. Once the leak is resolved, consider how your roof and drainage work together during heavy rain. Clear gutters and sound roof materials help direct water away from vulnerable areas, while a roofing assessment can clarify whether maintenance or a broader upgrade makes sense.
If you’re still deciding what to do about a roof leak stain on the ceiling, focus first on protecting your home, then choose repairs based on the source and condition of the roof. Thoughtful Roofer offers Asphalt Shingle Roofing, Seamless Gutters, and Metal Roofing for residential roofing needs in Huntsville and surrounding communities.
Contact Thoughtful Roofer for help with a roof concern and take the next step toward a drier, more dependable home.
Frequently Asked Questions
Does a Ceiling Stain Mean I Have a Leaky Roof?
No, a ceiling stain can come from roof damage, plumbing leaks, HVAC condensation, or moisture from a steamy room. Its location can help narrow the cause: a mark beneath an upstairs bathroom may point to plumbing, while a stain under the attic after rain makes roof entry more likely. Compare timing and nearby fixtures before deciding which repair is needed.
How do I know if there is mold?
Visible fuzzy or discolored patches and a persistent musty smell can indicate mold, especially near a damp ceiling or wall. A dark mark alone doesn’t confirm mold, since water can also stain paint and drywall. Don’t scrape or disturb a suspicious patch. Check whether the area remains damp, and arrange an assessment if mold-like growth or odor persists after the leak source is addressed.
Is it expensive to repair ceiling water damage?
The repair cost depends on what caused the damage, how far moisture traveled, and whether ceiling materials need replacement. A small, dry surface stain differs from soaked drywall, damaged framing, or a leak that’s still active. Roof repair and ceiling restoration are separate parts of the job. Identify the source and full extent of damage before planning cosmetic work.
Step 3: Repair or replace ceiling?
Repair the ceiling if the damage is limited to a small, dry surface area and the material remains firm. Replace damaged drywall if it’s sagging, crumbling, or unable to dry thoroughly. First stop the leak and allow the affected area to dry. Then patch holes or restore the surface as appropriate. Paint alone won’t repair weakened material or resolve moisture behind it.
What Makes a Roof Leak in the First Place?
Roof leaks often begin where roofing materials are damaged or where water must pass around a joint. Missing or cracked shingles, deteriorated flashing, loose seals around vents, and trouble in roof valleys can all create entry points. Hail, aging, and weather exposure may weaken materials. Leaves or branches blocking drainage can also let water build up near vulnerable roof edges.
Why is there a water mark on my ceiling but no leak?
A ceiling mark can remain after an old leak has stopped, so a visible stain doesn’t always mean water is entering now. Condensation can also leave marks, particularly in a steamy bathroom where humid air meets a cooler surface. Plumbing or HVAC issues may cause intermittent moisture that isn’t present during your inspection. Track changes after rain, showers, and system use.
What should you do immediately when you notice a roof leak stain on the ceiling?
Photograph the stain, move belongings away, and place a container beneath active dripping if it’s safe. Keep people clear of any bulging or soft ceiling area. Note whether the mark appeared after rain or water use, since that timing helps narrow the cause. Avoid climbing onto a wet roof or covering the stain with paint before the moisture source is resolved.
How can you tell if a ceiling stain is from an active roof leak or an old leak?
Compare fresh photos with the stain’s current edges and look for new dampness, bubbling paint, or changes after rainfall. A mark that stays dry and unchanged may be old, but its appearance alone can’t establish whether the roof is sound. Check the attic for fresh water trails or wet insulation if access is safe, and note whether the stain changes during storms.