Did you know that the water dripping from your living room ceiling could have entered your home twenty feet away from where you’re standing? It’s a frustrating reality for many homeowners in North Alabama, where our intense storm seasons can drive rain into the smallest, most hidden gaps. Learning how to find a leak in your own roof requires more than just looking at a water stain; it demands a bit of “inside-out” detective work.
We understand the anxiety that comes with a mystery leak. It’s natural to worry about hidden structural damage or the fear of a contractor overcharging you for a problem they haven’t fully explained. You deserve to know exactly what’s happening above your head. This guide will teach you our thoughtful process for identifying the true entry point using safe interior diagnostics and methodical exterior checks. By the end, you’ll know if you’re facing a simple pipe boot repair or a more significant issue, giving you the clarity and confidence needed to protect your family’s home.
Key Takeaways
- Recognize early indicators of moisture like bubbling paint or musty odors to protect your home’s structural integrity.
- Master how to find a leak in your own roof by understanding how water travels along rafters; it often appears far from the actual source.
- Focus your search on high-risk areas like pipe boots and chimneys, which are the primary causes of leaks in our local climate.
- Use a safe, two-person diagnostic method to confirm the leak’s location while keeping your feet firmly on the ground or a secure ladder.
- Determine when a problem requires a professional inspection; this helps you avoid voiding warranties or missing deep-seated storm damage.
Signs of a Roof Leak: Starting Your Interior Diagnostic
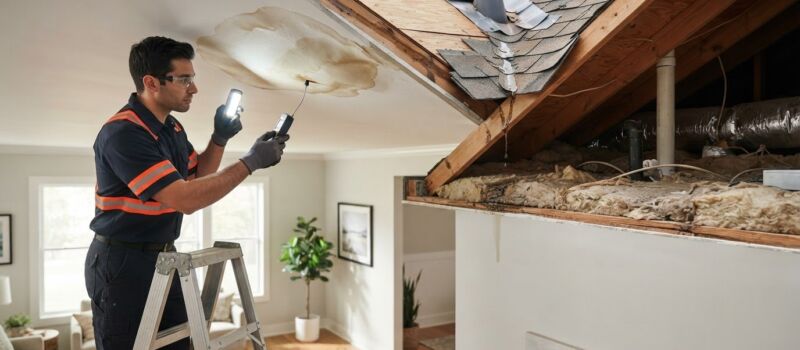
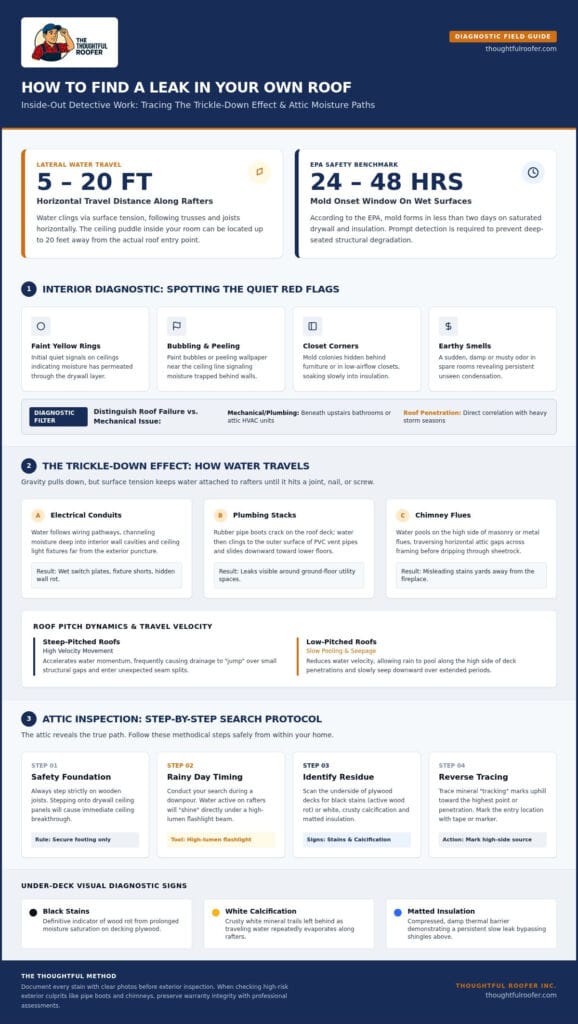
Have you noticed a faint yellow ring on your ceiling or a sudden, earthy smell in the spare bedroom? These are often the first quiet signals that your home’s protective layer has been compromised. Identifying these red flags early is the most critical step in learning how to find a leak in your own roof before the damage spreads to your structural beams. While a dripping ceiling is an obvious sign, many leaks start as subtle moisture that stays hidden behind your walls for weeks.
Look beyond the obvious puddle. Bubbling paint or peeling wallpaper near the ceiling line often indicates moisture trapped behind the drywall. Don’t forget to check the corners of your closets or behind furniture; mold growth in these low-airflow areas can signal a slow, persistent leak that’s soaking into your insulation. According to the EPA, mold can begin to grow within 24 to 48 hours of a surface becoming wet, so acting quickly is a matter of household safety.
It’s important to distinguish between a roof failure and a mechanical issue. If the spot is directly under an upstairs bathroom or near an HVAC unit in the attic, it might be plumbing or condensation. However, if the marks appear after a heavy North Alabama storm, the roof is your likely culprit. We recommend documenting every spot with clear photos immediately. This documentation is a cornerstone of our thoughtful approach, as it provides the evidence needed for professional assessments or potential insurance claims later.
The Attic Inspection: Your Best Tool for Detection
The attic is the most honest part of your home. When you head up there, safety is your priority; always stay on the wooden joists to avoid stepping through the ceiling. Use a high-lumen flashlight to scan the underside of the roof deck. You aren’t just looking for active drips. Look for “black stains” which indicate wood rot, or white, crusty calcification on the plywood. If you find damp or matted insulation, you’ve likely found a slow leak that has been bypassing your shingles and saturating your home’s thermal barrier.
Timing the Search: Why a Rainy Day is Actually Best
While most people wait for the sun to come out, a heavy downpour is actually the best time to see a leak in action. During a Tennessee Valley storm, the water will “shine” when your flashlight hits it, making it much easier to trace the path back to the entry point. Because water can travel 5 to 20 feet along rafters before finally dripping onto your ceiling, seeing the flow in real-time helps you pinpoint the source. Once you find the damp spot, mark it with a permanent marker or a piece of tape. This makes it much easier to locate the corresponding area on the exterior once the weather clears and it’s safe to inspect the shingles.
The Trickle-Down Effect: Why Leaks Aren’t Always Where They Seem
Why does the water stain on your ceiling never seem to line up with the hole outside? This is one of the most confusing aspects of home maintenance. In reality, water is a master of disguise. It uses surface tension to cling to your roof’s underside, following the path of least resistance along rafters or trusses. Gravity pulls it down, but surface tension keeps it attached to the wood until it hits a joint, a nail, or a drywall screw. This is why learning how to find a leak in your own roof requires looking at the physics of your home rather than just the wet spot on your floor.
According to industry data, water can travel horizontally between 5 and 20 feet along roof rafters before finally penetrating your ceiling. Common pathways act like highways for this moisture, leading it far from the original entry point. These pathways include:
- Electrical conduits: Water can follow wires deep into your walls or light fixtures.
- Plumbing stacks: Leaks often start at the roof boot and slide down the PVC pipe to a lower floor.
- Chimney flues: Masonry or metal flues can channel water across several feet of attic space before it drips.
Your roof’s pitch also determines how fast and how far water moves. Steeper roofs increase water velocity, often causing it to “jump” over small gaps, while lower-pitched roofs allow water to pool and seep through slowly over time.
Tracing the Rafters
When you’re in the attic, don’t just look at the drip point. Look up and follow the moisture trail toward the highest point of the roof. You’ll often see “tracking” marks, which are white or brown mineral deposits left behind as the water evaporates. These marks are like a map leading to the source. Pay special attention to the “high side” of any penetration, such as a chimney or vent, as water often pools there before finding an entry point. If the trail leads to a complex area, a professional roof leak repair specialist can use specialized tools to confirm the source without guesswork.
Capillary Action and Wind-Blown Rain
In North Alabama, we face unique weather challenges that can defy standard logic. During our severe storm seasons, high winds can actually push rain “uphill” under your shingles through a process called capillary action. This isn’t always a sign of a structural failure; sometimes, it’s a temporary bypass caused by extreme wind pressure. Distinguishing between a simple wind bypass and a failing underlayment is key to deciding whether you need a minor patch or a more comprehensive solution.
Exterior Inspection: Common North Alabama Culprits
Once you’ve marked the interior drip point, it’s time to step outside and look for the physical breach. While many homeowners assume the shingles themselves are failing, 90% of roof leaks actually occur at penetrations like vents, chimneys, and skylights. In the Tennessee Valley, our intense summer sun plays a specific role in these failures. The rubber “boots” surrounding plumbing vents often crack under the Huntsville heat within 7 to 10 years, which is often long before the asphalt shingles reach the end of their lifespan.
Valleys and step flashing are the next primary suspects. These are the areas where two roof planes meet or where the roof meets a vertical wall. Water accumulates here in high volumes during our heavy downpours. Any gap in the sealant or a lifted piece of metal flashing can invite moisture inside. Additionally, the high humidity in North Alabama encourages moss and algae growth. These organisms aren’t just an eyesore; they trap moisture against the shingles and can eventually lift the tabs, creating an entry point for wind-driven rain. Understanding these regional factors is a vital part of learning how to find a leak in your own roof before the damage becomes structural.
Shingle Health Check
Safety is our top priority, so we always recommend starting your exterior inspection from the ground. Use a pair of binoculars to look for “balding” shingles where the protective granules have washed away, or edges that are curling and brittle. It’s often difficult to distinguish between standard wear and tear and actual storm impact. If you’re concerned about recent weather events, you can learn how to spot hail damage to see if your issues might be part of a larger insurance claim. Identifying these patterns early can save you from a full replacement later.
The Gutter Connection
Your gutter system is your roof’s primary drainage partner. When gutters are clogged with pine needles or deciduous debris, water backs up under the eaves. This is the Southern equivalent of an ice dam; the standing water finds its way under the shingles and rots the fascia board. A properly installed drip edge is essential for preventing this. Without it, water wicks backward into the wooden structure of your roof. This causes hidden rot that often goes unnoticed until a major storm pushes the system to its breaking point.
The Garden Hose Test: A Step-by-Step DIY Diagnostic
What if you could recreate a North Alabama thunderstorm on a sunny afternoon? When visual inspections in the attic and on the ground don’t provide a clear answer, the garden hose test is the most effective way to simulate rainfall and trigger a visible drip. However, this isn’t as simple as pointing a nozzle at your shingles. Learning how to find a leak in your own roof using this method requires a disciplined, “low-to-high” approach to avoid false positives and unnecessary water damage.
Safety is our absolute priority. Never attempt this test alone, and never climb onto a steep-pitch roof or any surface that is wet. Under OSHA guidelines, fall protection is required for work at heights of 6 feet or more, and we strongly advise homeowners to stay on the ladder or the ground. Use a two-person system: one person stays in the attic with a high-lumen flashlight and a cell phone, while the other operates the hose. This real-time communication ensures you can stop the water the second a drip appears.
The “low-to-high” rule is the most important part of this diagnostic. Start by spraying the lowest points of the roof, such as the eaves and the lowest vent boots. If you start at the ridge (the top), water will run down over every potential leak point below it, making it impossible to tell exactly where the water entered. Spend at least 5 to 10 minutes on each specific area before moving upward. Water takes time to soak through the underlayment and travel along the rafters before it becomes visible in the attic.
Isolating the Area
Precision is better than volume. Rather than soaking the entire roof, focus your stream on one penetration at a time, such as a single chimney side or one plumbing vent. If the person in the attic sees a “shine” from a fresh drip, they should immediately signal the person outside to stop. Marking these spots from the inside makes it much easier for a professional to implement a permanent fix. If you’ve tried this method and still can’t find the source, it’s time to request a professional roof leak repair diagnostic to protect your home’s structure.
Safety and Damage Prevention
Use a gentle, rain-like setting on your hose nozzle. High-pressure jets can artificially force water under shingles that are otherwise functioning perfectly, leading to a “leak” that wouldn’t happen during a normal storm. Your goal is to simulate nature, not to pressure wash your decking. Be mindful of the volume of water you’re introducing into your attic. If you see water beginning to pool on the insulation or drywall, stop the test immediately. The goal is to identify the entry point, not to cause the very structural damage you’re trying to prevent.
When to Call a Professional: The Thoughtful Approach
Once you’ve gone through the steps of learning how to find a leak in your own roof, you may reach a point where the problem exceeds a simple weekend fix. We believe in empowering homeowners with knowledge, but we also recognize when a situation becomes a threat to your household’s safety. Some “deal-breakers” require immediate professional intervention to prevent a total roof failure. If you notice structural sagging in the roofline, widespread wood rot in the attic, or daylight shining through large sections of the decking after a North Alabama storm, the time for DIY diagnostics has passed.
If you must wait for a repair crew during a rainy stretch, emergency mitigation is key. Correctly using a tarp as a temporary stop-gap involves securing it over the ridge and down the slope, ideally using weighted sandbags or furring strips nailed into the fascia rather than the shingles themselves. This protects the structure without creating new holes that could lead to even more leaks down the road.
Professional Inspection vs. DIY Search
A professional roof inspection goes much deeper than a visual search. While a homeowner might spot a drip, our team uses specialized tools like thermal imaging cameras to find temperature anomalies that indicate trapped moisture behind walls. We also use high-precision moisture meters to determine if your insulation is salvageable or if it has reached a level of saturation that requires replacement to prevent mold growth. This technical depth ensures we address the root cause of the moisture, not just the visible symptom. When extensive moisture damage means a simple patch is no longer viable, homeowners can learn more about Project-Based Roofing Installation & Replacement Contracts to see how reputable contractors outline work scope, materials, and warranties.
Your Next Steps in Huntsville
At Thoughtful Roofer Inc., we handle every leak diagnostic with a proprietary workflow that prioritizes your family’s safety and peace of mind. As a veteran-owned company, we take pride in our integrity and our specialized knowledge of the Tennessee Valley climate. When you’re ready for a repair, you can help the process move smoothly by clearing your driveway for our equipment and securing pets in a quiet area of the house. Found the leak? Contact Thoughtful Roofer today for a professional repair estimate and let us provide the stable, long-term solution your home deserves.
Protecting Your Huntsville Home for the Long Term
A roof leak is more than just a home maintenance task; it’s a direct threat to your family’s safety and comfort. By understanding the physics of water travel and using methodical interior checks, you’ve taken the first step toward stability. Knowing how to find a leak in your own roof gives you the power to act before small drips turn into major structural repairs. Whether you’ve identified a cracked pipe boot or are still tracing a mystery trail along your rafters, you don’t have to face these challenges alone.
At Thoughtful Roofer Inc., we bring veteran-owned integrity and a proprietary diagnostic workflow to every home we serve. We are dedicated to protecting families across Huntsville, Madison, and the entire Tennessee Valley from the unique weather extremes of our region. If your DIY search has reached its limit, we are here to provide a clear, professional path forward. You can Schedule Your Thoughtful Roof Inspection in Huntsville today to ensure your home remains the secure sanctuary it was meant to be. Your peace of mind is our highest priority.
Frequently Asked Questions
Can I find a roof leak myself without going on the roof?
Yes, you can safely begin the diagnostic process from inside your home. An attic inspection is the most reliable way to trace moisture trails back to the entry point without stepping on a shingle. You can also use binoculars from the ground to spot cracked pipe boots or missing shingles. Starting indoors protects you from fall risks while providing the “inside-out” perspective needed to understand how to find a leak in your own roof effectively.
Why does my roof only leak during heavy wind and not regular rain?
High winds in the Tennessee Valley can push rain “uphill” under shingle tabs or flashing that normally sheds water downward. This phenomenon, known as capillary action, often happens during severe storms when pressure forces moisture into gaps that regular rainfall cannot reach. It’s often a sign that your underlayment is aging or that specific shingle tabs have lost their adhesive seal, allowing the wind to lift them just enough for water to enter.
How much does a professional roof leak detection service cost in Huntsville?
Costs for professional leak detection in the Huntsville area vary based on the roof’s complexity and the diagnostic tools required. Factors like the number of stories, the roof pitch, and whether thermal imaging is needed to find hidden moisture will influence the final fee. Most local professionals charge a flat rate for the initial diagnostic visit. At Thoughtful Roofer Inc., we prioritize a meticulous proprietary workflow to ensure we find the root cause, not just the symptom.
Is a small water stain on the ceiling a sign of a major problem?
A small stain shouldn’t be ignored, as it often masks a larger issue hidden in the attic. Even a tiny entry point can saturate your insulation and lead to wood rot over time. In many cases, a small stain is the result of a failing pipe boot or a single lifted shingle; these are relatively minor repairs if caught early. However, waiting until the stain grows can lead to structural damage and expensive remediation.
Can a clogged gutter really cause a roof leak?
Absolutely. When gutters are filled with debris, water has nowhere to go and begins to pool at the roof’s edge. This standing water can eventually wick backward under the shingles and rot the fascia boards or the roof decking. In North Alabama, this is a frequent cause of leaks during our heavy spring downpours. Maintaining clear gutters and ensuring a proper drip edge is installed are essential for protecting your home’s perimeter from moisture intrusion.
How long can I wait to fix a roof leak before it causes mold?
You have a very narrow window to prevent fungal growth. According to the EPA, mold can begin to germinate on wet building materials within 24 to 48 hours. Once moisture enters your attic insulation or drywall, the clock starts ticking. Promptly drying the area and sealing the exterior breach is the only way to avoid the health risks and high costs associated with professional mold remediation in our humid Alabama climate.
Will my homeowners insurance cover a roof leak repair?
Coverage usually depends on the cause of the damage. If the leak is the result of a sudden, accidental event like a Huntsville hailstorm or a fallen tree limb, your policy likely covers the restoration. However, insurance typically won’t pay for leaks caused by standard wear and tear or a lack of maintenance. We help our neighbors by providing the professional documentation and administrative advocacy needed to clearly show adjusters the extent of storm-related damage.